Prefix Abbreviations for control names – Visual Basic

In visual Basic you should know what are the Prefix Abbreviations for control names before you start with your program. For this you can easy to determine what object you are working on and easy for you to locate the object if problems or debugging occurs. For me, it will make you programming works easy and faster if you do it in organize manner.

To all visual basic programmers out there especially for the beginners, here are the Prefix Abbreviations for control names, it will serves as your reference for your programs that you are working on, just see it below. 
I hope it will help you a lot, thanks for visiting my blog and come again!
Continue Reading »

Using Case Select statement for beginners’ user Command Button – Visual Basic

Today I will share it to you another project in visual basic. This project is very easy to do if you know how to use Case Select statement. But if now, in this project you are going to learn using it, just follow the steps and procedures below!

The Case:
Weight (gram) Cost
0 - 50 1.4
51 - 100         2.7
101 - 250         4
251 - 500        7.5
The exceeding weight from 501 – up will be multiplied by 0.020.

In this project you are going to create a FRAME, 3 LABELS, A TEXTBOX, and A COMMAND BUTTON. Just look like the screenshot below. You can create your own if you want but if you want to follow my own work, also you can.

Don’t forget to rename your object in order your program works properly. I hope you know how to rename the object but if not you can go to Prefix Abbreviations for control names for your reference.

After you done creating those object I’ll mentioned and its looks like the screenshot above, you can go now to the coding.

To add the code, 
1. Simply Double Click the CALCULATE Command Button
2. Add the following code:
Dim Weight As Integer

Weight = txtweight

Select Case Weight
    Case Is <= 50
    lblamount = 1.4
    Case Is <= 100
    lblamount = 2.7
    Case Is <= 250
    lblamount = 4
    Case Is <= 500
    lblamount = 7.5
    Case Else
    lblamount = Weight * 0.02
       
End Select

3. After you add the code, test your program by pressing F5 key.
4. Enter an Integer in your Textbox and click Calculate
5. Once your program is working, your program looks like the screenshot below.
6. If you see that the screenshot is looks like with yours, Congratulations! You made it.
I hope it help to those beginners who want to know visual basic using Case Select Statement.
Continue Reading »

Simple Converter using If Else statement in Visual Basic

Another Visual Basic tutorial for beginners out there. Today, I want to share you my Simple Converter Program using If Else statement, the source is very easy for you to understand. No worries about the sure code, just simply secure the objects you are be needing in order to run the program.

In this project you are going to create the following objects:
  1. FRAME and change its caption to "Converter".
  2. COMBO BOX and name it "cboselectconvertion", in the Text property just type ”Select Conversation”. In the List just key-in Pound to Kilo, Kilo to Pound, Centimetre to Foot, and Foot to Centimetre
  3. TEXT BOX and name it “txtvalue1”, in the Text property just input “0”.
  4. Another TEXT BOX and name it “txtresult”, in the Text property just input “0”.
  5. COMMAND BUTTON and name it “cmdconvert”, in its caption simply type “Convert”.

In your COMMAND BUTTON, double click and insert the following codes:

If cboselectconvertion = "" Then
txtvalue1 = "0"
txtresult = "0"
ElseIf cboselectconvertion = "Pound to Kilo" Then
txtresult = txtvalue1 / 2.2
ElseIf cboselectconvertion = "Kilo to Pound" Then
txtresult = txtvalue1 * 2.2
ElseIf cboselectconvertion = "Centimetre to Foot" Then
txtresult = txtvalue1 / 30.48
ElseIf cboselectconvertion = "Foot to Centimetre" Then
txtresult = txtvalue1 * 30.48
End If

Once you almost done, your output may look like this:


And you had properly inserted the codes, after the selection of your desire conversion option, you program look like this:


If you encounter some errors you can debug and refer the source and objects I’ll give because I have been tested the program already and working find. You can also raise your questions here using the comment box system. 
Continue Reading »

Display your Full Name in Visual Basic using Dim As Astring

Today I want to share you my finished activity yesterday. In this activity you will learn on how display your Full Name in a LABEL object using Dim As String. I know that it will help you for your program in the future as a beginner.

The objects you needs are Three (3) LABELS, Two (2) TEXTBOXES, One (1) COMMAND BUTTON, and One (1) FRAME.

Just look like this screenshot:

Only the COMMAND BUTTON has a source code. To put the source code in your COMMAND BUTTON simply DoubleClick and enter the source code:

Dim FirstName As String
Dim LastName As String
Dim YourName As String

FirstName = Text1.Text
LastName = Text2.Text
YourName = FirstName + " " + LastName

lblname.Caption = YourName

After you have done, run your Program and give a test. If you do it right, the screenshot will be like this:
Continue Reading »

Color Changing using Microsoft Visual Basic 6.0

In Visual Basic 6.0 you can create amazing color changing program, you can use the RGB (Red, Green, Blue) color and combine them using your color changer program. I know that you gonna say WOW! if you finish and runs this program. You wanna know, because it’s AMAZING!

I want to share this to all beginners in Visual Basic 6.0 to let you experience what I am saying. Here are the procedures you are going to follow in order for you to create a color changing program, simply follow all the steps correctly to avoid errors. 

1. Open a new form and change its name to frmColorChanger
Create and place the following objects on this form.
- A heading label1 (Caption=Color Changing)
- 3 horizontal scroll bars (Set the max value property of all three to 255)
- 3 labels (Red, Green, Blue)
- Another 1 label under the horizontal scroll bars1 (Caption=Wow!)

Just look like this: 

2. Double click each scrollbar and add the following code to its_onChance() event.
lblHeader.BackColor = RGB(hsbRed.Value, hsbGreen.Value, hsbBlue.Value)
lblBody.BackColor = RGB(hsbRed.Value, hsbGreen.Value, hsbBlue.Value)
    
lblHeader.ForeColor = RGB(255 - hsbRed.Value, 225 - hsbGreen.Value, 255 - hsbBlue.Value)
lblBody.ForeColor = RGB(255 - hsbRed.Value, 255 - hsbGreen.Value, 255 - hsbBlue.Value)
    
lblRed.BackColor = RGB(hsbRed.Value, 0, 0)
lblGreen.BackColor = RGB(0, hsbGreen.Value, 0)
lblBlue.BackColor = RGB(0, 0, hsbBlue.Value)

3. Double click the return command button and add the following code to its_onClick() event.

Unload Me

4. Use <F5> function key to test your project. Save and backup.

Done, Just look like this: 


I hope it will help you to enhance your Microsoft Visual Basic skills  and to create more amazing program in the future. 
Continue Reading »

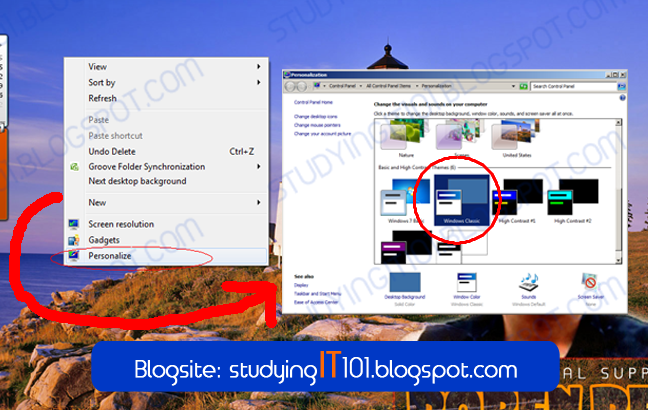
Visual Basic Tutorial: How to run smoothly Microsoft Visual Basic 6.0 in window 7 without dragging delay?

In Windows XP Visual Basic 6.0 run smoothly, I mean when you create a command button, text box, label, picture, horizontal scroll bar, vertical scroll bar, etc, if you drag it you cannot feel the delay, just look like this: 


But in Windows 7 it’s different, you can feel the delay and you cannot focus to your work because of this annoying problem, look like this:


Friend, don’t worry about that, every problem is always having a solution and always remember that every solution can create another problem. But friend, the solution I’ll tell you is working and will not create any cause of another problem, in short, its hustle free. 

How to run smoothly Visual Basic 6.0 in Windows 7 without dragging delay?
We have two options to solve this common problem in Visual Basic 6 with Windows 7.

Option #1.  You are going to change your CURRENT THEME to WINDOWS CLASSIC THEME

To do this: right click on your desktop - - > personalize - - > WINDOWS CLASSIC THEME


Option #2. You need to DISABLE DESKTOP COMPOSITION

To do this: right click Visual Basic 6.0 icon - - > properties - - > compatibility - - > check DISABLE DESKTOP COMPOSITION - - > then click OK


I hope this tutorial will help you a lot! Friend, I also encourage you to share this to your friends, to let them know about Visual Basic 6.0 tutorial to help them if they encounter this problem. Happy programming! 
Continue Reading »

What is the meaning of Conductor and Insulator?

Everything in this world harms us if we don’t know how to use or handle it. Electricity is very important and useful one, if we don’t have electricity, we can’t operate computers, big machines, lights and other equipment using electricity. But on the other hand electricity can be a harmful one, if you don’t know how to it, it could be your end. 

So, properly handling and use is recommended to avoid any harmful effects. Electricity can flow to the materials called conductor. 

What is conductor? 
Conductor – is a material with plenty of free electrons, voltage or current can flow.
Example: iron, metal, nickel, silver, gold, aluminum, germanium, tungsten, nicrome, water, copper

Silver 
• is the best conductor.
• very low resistance.

SCAIL – is the descending order of conductivity of a conductor used in an electronic circuit. 
• S – Silver 
• C – Copper 
• A – Aluminum 
• I – Iron 
• L – Lead

Now you know the materials that conduct electricity, so you are now aware about it. If you can see any conductor materials with the presence of electricity don’t touch it without using insulator. 

If we have conductor, we also have insulator. 

I have a simple question, why birds can land to a power-line with 1000 volts presence without electrifying happens? A good question needs a good answer, because bird’s foot has an insulator. 

What is insulator? 
Non Conductor or Insulator – is a material lacks or no free-electrons, voltage or current cannot flow.
Example: rubber, plastic, paper, glass, cork, wood, cloth, porcelain

Glass
• is the best insulator at room temperature 
• it cools

Insulator can be use in troubleshooting deals with electricity.  It is safe to handle electricity when you are using insulator, rubber is a common insulator use in all aspect of dealing with electricity. 

Continue Reading »